- Power off audio panel
- Place the pilot side headset on your head
- Hold down NAV2 & MKR switches at the same time
- Continue to hold down the two switches and power up the audio panel, after power up hold down both switches for at least 5 seconds
- You will hear "ding" sound in headset, if you do not hear this then start over.
- Audio panel is complete
- Remove PMA8000BT device from your smart phone
- Search for Bluetooth devices from your smart phone
- Select PMA8000BT
- If password is required try 0000 or 1234
- Once paired stream music and place phone call
The following is a list of recommendations for use when sending a unit back to PS Engineering for service:
- You must obtain a Return Material Authorization (RMA) before returning any product to the company.
- DO NOT SEND VIA US MAIL. Use a shipping service such as UPS or FedEx. These carriers offer insurance and reliable tracking of your unit in case it is lost or damaged. PS Engineering is not liable for lost shipments to the company.
- Please include in the box your name, phone number and your RMA number.
- You may optionally include your credit card number and expiration date in the letter. This only applies if we are performing out-of-warranty work, or if you would like your unit returned to you by overnight express shipping.
- Make sure to send your unit to the following address.
PS Engineering, Inc.
Attn: Service Dept
9800 Martel Road
Lenoir City, TN 37772
Airplanes are noisy places. The addition of a good quality intercom, and active noise canceling headsets does wonders for removing mechanical (wind, engine, etc.) noise. It also allows us to hear electrical noise that used to be masked by the mechanical noise.
However, if properly installed with a nominal electrical system, PS Engineering audio systems should reject most of the electrical noise, for a fairly quiet headset environment.
The MOST important part of any intercom is the installation. No intercom can work well if not properly wired. Because of the amount of power PS Engineering systems put in the headphones, we need to have shielded wires, which are properly terminated. If not properly shielded, and isolated from airframe ground, the audio signals can fall prey to the large noise signals present in the airframe itself. The noise signals happen to be in the audio range, so no amount of filtering can adequately remove them without loss of fidelity.
In addition to shielding, it is vital to keep the intercom wiring away from the really big wires for the alternator and power distribution. These are sources of noise, as are strobe power supplies, panel lamp dimmer systems, autopilot servos, blowers, and even antenna cables.
Installation is so important. That's why we recommend a professional installation, and or using a custom- made harness from PS Engineering.
One issue specifically affects the Bose® installation. For best results, the Bose panel power supply must be grounded to the same place as the intercom/audio panel. This prevents airframe electrical noise from entering the system.
Finally, it is important to realize that while intercoms have improved markedly in the last 30 years, the old Microline or ARC avionics systems have not. Adding a high quality intercom will improve the cockpit communications, but we can't change the fact that your microphone is still transmitting over an old radio, and you are still listening to a very faithful reproduction of the receiver signals from that radio.
This is an issue of sidetone. Sidetone is the part of the microphone signal that is sent back to your headset so you can hear yourself talking. It's important that you get these audio cues so you know you ARE talking, and loud enough.
During radio transmissions, sidetone is created by the com radios, and serves to verify that everything is working. So while you are transmitting, the intercom is turned off and you are hearing what the aircraft radio is providing. Anyone who can hear the radios on the intercom will also hear the sidetone.
Sometimes, the com radio does not produce sidetone This is particularly true with ARC (Cessna) radios.
In these cases, the intercom or audio panel can be modified by an avionics shop to create an artificial sidetone in the intercom. This modification allows the intercom to continue to operate during radio transmissions, so what you are hearing is the intercom, not the radio.
In other cases, sidetone can be lost because of installation problems. This occurs when Radio Frequency Interference (RFI) enters the intercom wiring during transmit, and cancels the sidetone. We have found this is caused by incorrect jack wiring, usually because of grounding of the microphone jacks at the jack end to the airframe.
The ONLY place the jacks should be grounded is the intercom.
You will not hurt our stereo intercoms (PM3000) or audio panels when you use a mono (1-channel) headset. The mono headset WILL ground out the left side of the audio. In the pilot or copilot positions, nobody will notice. Audio will be present in both ears.
However, optimal performance will not be achieved due to the fact that one audio channel will no longer be heard and it is possible some additional white noise will be heard.
In any passenger position, plugging a mono headset will force any other stereo headset to become mono, too. Those stereo headsets will only hear in one ear, unless they switch to the mono mode.
All PS Engineering intercoms and audio panels support an entertainment input. When they are installed, the avionics shop should add a small (1/8") stereo jack to the airplane. If it hasn't been installed, the avionics shop can add one easily (depending on how difficult it is to get to the intercom). This is hard-wired into the intercom's main connector.
You can use a portable stereo tape or CD player to play music through this jack. If your intercom is monaural (PM1000-Series, PM500EX), you will not have stereo separation. When installing the music jack in mono installations, a stereo music jack should be used and the left and right channels shorted together at the jack.
One word of caution. PS Engineering cannot control the quality of portable devices. We have had personal experience with portable CD players radiating signals that interfere with VHF Com. Please be sure any portable music devices or built in automotive types, are completely OFF during take off-approach and landing, or any time communications are important. If you experience ANY navigation or communication anomalies, switch off the entertainment source.
There are a wide variety of voltages output from portable players. They are designed for personal use, not for a standard interface. We've seen that the type that uses 4 AA batteries is louder than just 2.
Another problem we've seen many times is the use of wrong cables from the player to the intercom. All cables are not created equal, even if the plugs fit.
Some adapter cables, used on camcorders, actually attenuate, or reduce, the amount of signal between the player and intercom. They don't have much to start with, and don't have any to spare. Be sure to get a "non-attenuating" cable.
Finally, when using a portable device, be sure to use the normal headset output, and expect to have the volume control at the loudest setting.
You shouldn't. But be sure NOT to hook the speaker output directly to the intercom. It will fail.
The PS Engineering intercoms are designed to accept a low-level ( less than 3 V P-P) audio signal, like the ones provided by portable devices. Car stereo headphone amplifiers are not referenced to ground, and our intercoms are, so the moment power is turned on, the output amplifier will try its hardest to find ground, even if it has to let the smoke out of components.
We recommend using a "Line Level" output from the car stereo. This is the one usually used for power amplifiers, equalizers and other add-ons. Again, the signals on this line vary widely between the brands and model.
IF your automotive stereo does not have a "line out" there is an adapter available from Crutchfield . Called the PowerLinkII (PL2) this connects between the stereo and the intercom. It provides the proper levels and can be adjusted to suit your needs.
Bottom line, the amount of effort the installer will have to make to interface properly a car stereo probably won't be worth it.
At PS Engineering we've committed to value, utility and safety. Although all of our systems have a fail-safe mode, the intercom must still be in the aircraft to use the radios.
In many cases, if you are retrofitting an intercom into a typical aircraft, these jacks are already there. These are where the existing headset was connected.
The additional jacks, which we call "auxiliary," serve several purposes. First, they allow you to easily install a new intercom, because these auxiliary mic and headphone are wired straight to the aircraft radio's jacks.
Second, they are a great troubleshooting tool. Suspect an intercom problem? Just move the headset to the aux jacks, if the problem remains, it isn't in the intercom.
Third, they are the only way you can use the radios if you remove the intercom for any reason. Since the intercom is between the headset and the radios, when it is unplugged, the pilot and copilot jacks are disconnected, too.
Sometimes it pays to read the manual, but okay, that's why we're here. On the PM3000 (and the PM2000), the SoftMute™ is selectable for the main music source (Entertainment 1). Pushing the squelch knob activates and deactivates the SoftMute™.
On the PMA7000B the ICS push button acts as the SoftMute control. For the PMA8000B, the Mute button selects the mute mode for the pilot and copilot. It is also possible to have the installing party to configure the AUX pushbutton to act as the SoftMute™ for the passengers. See the installation manual for details.
Maybe.
Approval is determined by your PS Engineering dealer who will work directly their local FAA FSDO. When a part is not approved by the TSO, PMA, or STC process, the part is unapproved. Only the FAA can approve a non-approved part for installation in a certified aircraft.
We suggest that your shop completes a Form 337 and have it approved BEFORE installation begins.
PS Engineering strongly recommends the installation of only TSO'd units into certified aircraft.
(Please note this answer only applies to stand alone Intercoms.)
The most common cause of this problem is that the installer failed to provide independent PTT wires to the Pilot and Copilot mic jacks. (Additionally, it is highly probable they also failed to install the required AUX Mic and AUX Headphone jacks, see FAQ #23).
There is a voting system in the intercoms, and if the pilot's PTT is not hooked up to the Pilot's Mic jack, and if the copilot's PTT is not hooked up to the Copilot's Mic jack, the appropriate mic audio will not get through to the aircraft radio.
This problem could occur under either of the following conditions:
- The radio input audio is to low too trigger the digital recorder. Try increasing the volume on your radio and then check the digital recorder operation again.
- During the playback of a message, if the playback button is held down for more than a few seconds, the digital recorder will activate its auto shutdown feature. You only need to push the button once for the recorder to begin playing the last recorded message. Holding the button is not necessary to continue playback.
When designing our audio products, our engineers used best practices when it comes to eliminating as much electrical noise as possible. Our design technique keeps "power ground", "digital ground", and "signal ground" isolated until they are brought together at one point. While an ohm meter might say all these grounds are the same, an impedance analyzer would tell you different.
"Audio Low" is the "signal ground" of the circuit. This terminology is used throughout our harness schematics. It is not power ground and therefore, should never use a conductor that could be used for power ground. (Airframes are commonly used for power ground). This is why we don't use single conductor shielded cable but rather, use a separate conductor in the shielded cable as an "audio low".
Strict adherence must be made to the wiring schematic to assure the best performance of our products.
These jacks are compatible with PS Engineering systems. These are MONO jacks so while all of our intercom and audio panels will work with this plug, the system will be forced to be monaural. What's missing is the radio Push-to-Talk. This button is mounted on the control stick in this sort of aircraft, and the button wired back to the mic cable to take advantage of the shielding, if possible
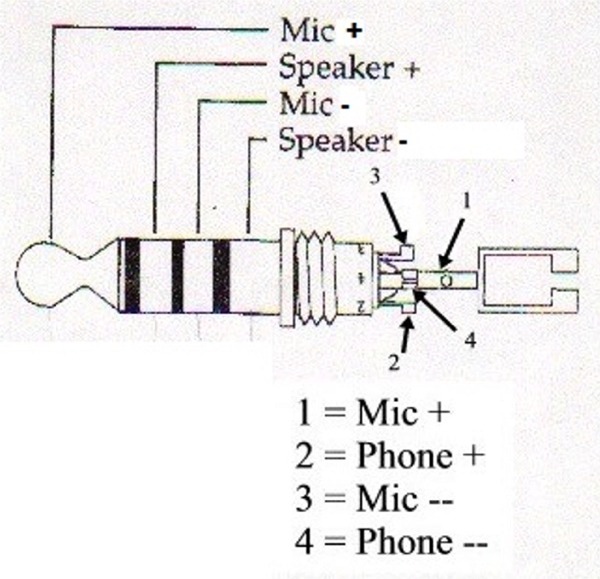
This diagram shows the Mic audio high goes to pin 1, phones audio high goes to pin 2, Mic low to 3, and phones low to 4.
You need to be sure that any headset or helmet equipped with such a plug uses general aviation microphone (150 ohm) and headphone (150 to 600) impedance. Military systems are often 8 ohm, and incompatible with civil aviation units.
The problem you are describing is common. And it is important to know that it is not the audio panel that is causing the problem, but rather allowing it to occur. An explanation will help you understand what is going on.
The reason you are hearing this "bleed over" is because while one radio is transmitting, the other radio is still receiving. In a non-SPLIT mode capable audio panel, the audio panel inhibits the audio from the non-transmitting receiver, thus eliminating any sound from getting to the headset. But in SPLIT mode, the receiver is not inhibited in order to allow the other person to continue to listen to their radio.
This problem is directly related to the following:
- Radio Frequencies; how close can the two radios frequencies be tuned apart without bleedover
- Transmitter output power
- Receiver selectivity
- Antenna separation/location
You can see that there is nothing that can be done about 1 through 3. That leaves number 4. To possibly reduce the problem is to place one of the antennas on the belly of the aircraft. This will reduce the amount of radiated power getting to the receive antenna.
Don't feel alone; pilots in corporate jets even have this problem to a degree. However, they can get relatively close in frequency because they do have one antenna on the belly AND the aircraft is much larger so they can get larger separation.
Any dual audio panel system, even the ones in multi-million dollar aircraft, can have this problem, it is physics. Some are worse than others because of the above items 1, 2 and 3.
What is probably causing the problem is RFI (Radio Frequency Interference). A couple of things could have changed in your installation due to age, vibration, or corrosion.
To trouble shoot the system, first turn off your intercom and then transmit using the pilot headset.
If the problem still exists, then it is completely outside the intercom system and you will need to take your aircraft to a qualified avionics shop for evaluation.
If the sidetone returns to normal, then in all likelihood, the cause is too much Radio Frequency energy is getting inside the intercom.
(NOTE: It is assumed that the wire harness has been built to a PS Engineering specified wiring diagram and that sidetone levels of the aircraft radio have been adjusted to the proper level.)
It could also be that one of the shields on the intercom harness has been broken at the intercom connector or the SWR (Standing Wave Ratio) on your antenna system has increased due to degeneration of the antenna coax (moisture in the coax eventually breaks down the shielding), or more often, poor bonding at the antenna also due to oxidation.
Our aircraft audio products use passive filtering (a device that consists of two bead inductors and one capacitor). We have never had a failure of this device.
Place a 250K ohm resistor in the patch cord in-line (use a resistor small enough to place inside the shell of the plug) with the microphone circuit (Tip) of the cell phone.
This condition occurs because the transmit/receive circuit in the VAL760 goes to ground (or near ground) when the radio is turned off. This has the effect of placing our intercoms into a semi-transmit mode. While no electrical damage occurs, it will prevent the intercom from working normally when the radio is turned off. A series diode (1N4001) placed inline with the key line between the radio and the intercom will solve this problem. Install the anode facing the radio with the cathode (white line) facing the intercom PTT input line.
If I press the playback button, do I always get the whole minute?
- No, it will only play the last recorded message, regardless of the length of that message (up to one minute).
Do I get both sides of the conversation (e.g. my own voice), or do I get only what the radio received from another station?
- Only the aircraft radio audio that is heard in the headset is recorded, neither dead air nor intercom activity is recorded.
When the unit is turned off, is the memory erased?
- Yes.
It would be nice if I could control how far back the playback goes by hitting the playback button more than once, does it work this way?
- Yes. Press the playback button down and hear the last recorded message. Not the message you want? While that message is playing, hold down the playback button again and it will then stop playing and set itself to play the 2nd from the last message. Push the button again, and now you are hearing the second from the last. You can do this until you hear the message you wanted
All of our microphone drive circuits that we design and incorporate in our products are tested and certified using RTCA's DO-214 as required. This requirements document is referenced in FAA's TSO C50c, which is the Technical Standard Order the FAA uses as their standard for certifying audio products for aircraft. Section 1.5.2 states that microphone drive circuit must have an input impedance of 150 ohm +/- 20% and a dynamic voltage range of 20mV to 1.5V RMS.
Because of this design requirement, it is not possible to hook two microphones in parallel (in this scenario, a hand microphone and a headset microphone) because to do so would adversely affect this impedance and would require more drive current than the circuit is capable of providing. It is therefore recommended that either a placard is placed in the aircraft indicating that the hand microphone should be installed in lieu of the headset microphone, or, a switch be installed to switch from the hand microphone to the headset microphone.
This headset has an auto-shut off feature that monitors the mic bias. If the voltage at the mic stays above 0.5 volts, headset will stay powered on. Whenever it has less than .5 Volts then it will automatically shut off the ENC It is suggested in order to prevent the ENC from turning off, to turn off the auto-shut off feature.
The intercom does NOT get connected to either the Aircraft Radio or the Audio Selector Panel. (See FAQ #9). A set of Auxiliary Mic and Headphone jacks are required to be installed. The process of installing the intercom is as follows:
- Locate a convenient spot in your aircraft to install and to placard a Mic Jack and a Headphone Jack. Label them Auxiliary Mic and Auxiliary Headphone. Connect these jacks to the appropriate points to either the aircraft radio or audio selector panel. You might need to call the manufacturer of the radio or audio panel to get this information.
- Using a headset and an in-line PTT switch, connect to these jacks and test the radio(s) and confirm that you are able to transmit and receive from these jacks.
- Install the intercom
- Test the intercom using the Check Out Procedure located within the Installation Manual
- Connect the appropriate wires from the Intercom to the Auxiliary Mic and Headphone Jacks per the Intercom Installation Manual
- Test all systems.
When using a standard portable PTT switch, when installed in series with the headset microphone line, there will be no audio present through the intercom until the PTT is pressed. This is because there are two switches inside the PTT switch, One shorts the TIP and the Sleeve which is what keys the radio. The other switch closes to allow the mic audio from the microphone to the ring of the PTT's mic plug, which will allow the audio to pass to the intercom..
To modify the PTT so that the mic audio is always present, the PTT must be taken apart and the switch that makes and breaks the microphone path will be closed permanently.
Due the large variety of PTT, it is not possible for PS Engineering to provide details on how to accomplish this modification.
PS Engineering does sell already modified PTT switches, call +1-865-988-9800 to order.
The Bose A20 headset requires a connection to the PM1000II mic audio input for the automatic power down capability to work. By turning off the Automatic Power Down circuit inside the headset control manual, this problem will be eliminated.